LEAF-Writer Commons: Advanced
English Version
Accessing LEAF-Writer
To use LEAF-Writer, you will need a computer with internet access. At this point in development, LEAF-Writer Commons is not optimized for handheld devices. LEAF-Writer is compliant with all major browsers.
Leaf-Writer is found at: https://leaf-writer.leaf-vre.org/
You do not need to register for an account to LEAF-Writer. In order to take full advantage of LEAF-Writer's features - in particular being able to access and collaborate on documents in the cloud - you can use your GitHub account. If you don't' yet have a GitHub account you can register for one here
LEAF-Writer and Privacy
Privacy Settings: When you first access LEAF-Writer, you will be asked to consider your Privacy Settings via a cookie notification banner. You can choose to accept all cookies, some, or none. If you choose 'reject all cookies' you can work locally in LEAF-Writer (uploading from and downloading to your desktop), but cannot access or share documents on GitHub ('in the cloud'). You can always adjust your cookie settings by clicking on the 'i' at the top right of this screen.
Privacy settings can be accessed before or after opening a document via the identity button in the top right corner. These settings contain the full Privacy Policy and allow you to customize your cookies consent preferences. Strictly necessary cookies, without which the website cannot function, cannot be disabled. Cookies related to basic interactions and functionalities can be disabled, but doing so will limit the functionalities of LEAF-Writer. Anonymized measurement cookies, which collect information about your website activity, can also be disabled.
You can change your cookies preferences at any time, but, unless you save first, you will lose the current annotation and tagging work.
You can change your cookies preferences at any time, but, unless you save first, you will lose the current annotation and tagging work.
Exploring LEAF-Writer
Open a Document
When you open LEAF-Writer, you will be prompted to choose a template or sample, or to open a document from the Cloud or your device.
If you would like to open a document, it must be LEAF-Writer–compatible: an XML document that is well-formed and references a schema supported by LEAF-Writer. Supported schemas include the Orlando and CWRC bespoke schemas, as well as the customizations provided by the Text Encoding Initiative (TEI).
Open a Template
There are four available templates: Blank, Letter, Poem, and Prose.
Templates come with pre-existing text. To add your own text into a template:
- Right-click on the tag that contains the text you would like to delete.
- Choose Remove Content Only. This action will remove the content from the tag, but will leave the tag in the document.
- [Optional] Choose Remove All to delete the text and the tag.
For more information on tags, see the instructions for the Markup Panel.
Open From the Cloud
You can search for and load public LEAF-Writer–enabled documents or repositories from GitHub.
Upload From Your Computer
You can open a LEAF-Writer–compatible document (i.e., a document that has previously been opened in LEAF-Writer) from your computer by clicking From Your Device and dragging and dropping a file into the popup that appears.
Open Your XML Document
You can paste XML directly into the box provided (see screenshot below) to create a LEAF-Writer compatible document. If the document is not well-formed or uses a schema that is not supported by LEAF-Writer, it will not open.

Editor Modes
There are three editor modes in LEAF-Writer to support you in the way you want to tag, and what you want to do with the output of your markup. You can choose:
- Markup Only: allows you to tag in XML using a TEI or Orlando schema.
- Markup and Linking: to combine XML tags and RDF (Resource Description Framework) allows for Semantic Web annotations that are equivalent to the XML tags you create, and are consistent with the hierarchy of the XML schema so that annotations will not be allowed to overlap.
- Markup and Linking (with overlap): allows for only RDF to be created for entities; overlaps with existing XML structures.
The default mode is Markup and Linking, which allows XML encoding and also creates Web Annotations for certain tags, represented as buttons on the LEAF-Writer menu. Annotations are stored as JSON in the < xenoData > TEI tag. If you prefer to create XML markup without corresponding Web Annotations, then click on MARKUP & LINKING to select “Markup only” mode.
Workspace Features
You are now in the LEAF-Writer editing workspace. What follows is a quick overview of the workspace. Components are documented in more detail below. See the LEAF-Writer Basics Step-by-Step Tutorial to help get started in LEAF-Writer. There are four main areas of the space that are designed to optimize your encoding experience:
- The Left panel, including three tabs (Table of Contents, Markup, Entities)
- The center editing space, where you work on your text
- The right panel, including three tabs (Raw XML, Image Viewer, Validation)
- The toolbar, offering all of your tagging options (TEI elements, entities, translation) as well as various tools and settings.
File menu: At the top left of the workspace screen, next to the LEAF-Writer logo, you'll see three horizontal lines. Clicking on this icon will activate a drop-down menu that allows you to create a new, open, or import a document, save or save a different version of your document, or export the document in XML, HTML, or Markdown format. See here for more information about the LEAF Turning Engine.
Editor Settings: At the upper right of the workspace screen, next to your user avatar, you'll see a toggle button that allows you to change from editing to viewing mode. In viewing mode you'll notice that most of the editor functionality has disappeared to provide a read-only version of your encoded document.
Encoding settings: At the bottom left of the workspace screen are indicators that notify you about which editor and annotation mode you're working in, and which schema you are using for your document. See HERE for more information about schemas and LEAF-Writer.
Bug reporting: At the bottom right of the workspace screen, you'll see a button called 'Bugs/Requests' that will take you to an issue form on the LEAF-Writer GitLab repository.
Navigation Panels
There are three different tabs on the left-hand side of LEAF-Writer.
Table of Contents
The Table of Contents allows you to see and navigate through different sections in your document.
Markup Panel
The Markup Panel displays the document’s XML tags. From the Markup Panel you can add, delete, edit, and copy and paste tags in the document. Clicking on or hovering your mouse over a tag will show the full name of the tag as well as the first few words of the tag's content
- Click the tag until it shows
 next to it to select the contents of the tag.
 - Click the tag until it shows
 next to it to select both the contents of the tag and the tag itself.
For advanced users only: The Markup Panel also allows you to edit the document's header by right clicking on teiHeader, which will open the XML editor with only the elements in the document header. This feature currently has minimal functionality.
Entities Panel
The Entities Panel lets you see the entities tagged in the document. You may view the items in this tab sequentially, alphabetically, or categorically.
Hover your mouse over an entity and click Edit (pencil icon) to bring up a popup box where you can edit the attributes of an entity. Hover and click Remove (circle icon) to remove the tag.
Toolbar
LEAF-Writer has a toolbar that can be used to add, edit, and delete tags.
| Icon | Action |
|---|---|
| Displays a list of eligible tags you can add to your document. | |
 | Opens a popup that allows you to tag a person by name. |
 | Opens a popup that allows you to tag a place. |
| Opens a popup that allows you to tag an organization or company. | |
 | Opens a popup that allows you to tag a title or the text of any type of work. |
 | Opens a popup that allows you to tag a general purpose name or referring string. |
| Opens a popup that allows you to tag a citation. | |
| Opens a popup that allows you to tag a note or annotation. | |
 | Opens a popup that allows you to tag a date. |
 | Opens a popup that allows you to tag a correction you have made to the original text. |
 | Opens a popup that allows you to tag a keyword. |
 | Opens a popup that allows you to tag a link or URL. |
 | Opens a popup that allows you to add a translation for the text in a div. The translation appears in a new div that is added beneath the div with the original text. |
| Shows or hides XML tags in the Editing Pane. | |
| Opens a right sidebar that shows the document’s raw XML. This sidebar also contains the Image Viewer and Validation tabs. | |
| Validates the XML document against the associated schema. | |
| Opens the Settings Panel. | |
| Toggles to fullscreen view. | |
| Opens the LEAF-Writer Documentation in a new tab. |
Settings Panel
The Settings Panel is located in the toolbar. Use the Settings Panel to:
- Modify the appearance of the interface (light mode, automatic mode, dark mode).
- Change the language (English or French).
- Change the size of the text in the Editor Area.
- Turn Autosave on or off.
- Toggle whether or not entities are shown (highlighted) in the Editor Area.
- Reorganize the priority of the entity sources (see Tag Entities for more information).
- Allow or disallow Multiselection in the Markup Panel.
- Toggle whether or not Text Nodes are shown. If this option is toggled on, you can allow Drag and Drop and toggle whether or not to show Text Nodes Content.
- Reset Dialog Warnings.
Validate
LEAF-Writer has continuous validation, which means you will not need to validate your document manually as you work. If your document becomes invaild, a list of the errors will appear in the right-hand panel under the Validation tab.
If you would like to manually validate your XML document, click Validate in the toolbar. Click an error message to highlight the error in the document. You can then correct the invalid structure and the error message will disappear.
If you try to save a document that is not well-formed, a popup will appear asking you to confirm if you want to proceed. You should not save documents that are not well-formed. It is important to validate your document often and fix your errors as soon as they appear.
Right Click Menus
LEAF-Writer has two right-click menus that can be used to add, edit, and delete tags.
Editor Area Menu
Right-click the Editor Area to see a menu with nine options.
| Option | Action |
|---|---|
| Add Tag | Displays a list of eligible tags you can add to your document. |
| Add Entity Annotation | Opens a popup that allows you to add a tag. |
| Edit Tag | Opens a popup that allows you to edit the attributes of a tag. |
| Change Tag | Opens a popup that allows you to change a tag to a different tag. |
| Copy Tag and Contents | Copies a tag and the text it contains. |
| Split Tag | Splits one tag into two. |
| Remove Tag | Removes a tag, but keeps the content. |
| Remove Content Only | Removes the content from a tag, but keeps the tag. |
| Remove All | Removes the tag and its content. |
Markup Panel Menu
Right-click the Markup Panel to see a menu with ten options.
| Option | Action |
|---|---|
| Edit Tag | Opens a popup that allows you to edit the attributes of a tag. |
| Change Tag | Opens a popup that allows you to change a tag to a different tag. |
| Copy Tag and Contents | Copies a tag and the text it contains. |
| Remove Tag | Removes a tag, but keeps the content. |
| Remove Content Only | Removes the content from a tag, but keeps the tag. |
| Remove All | Removes the tag and its content. |
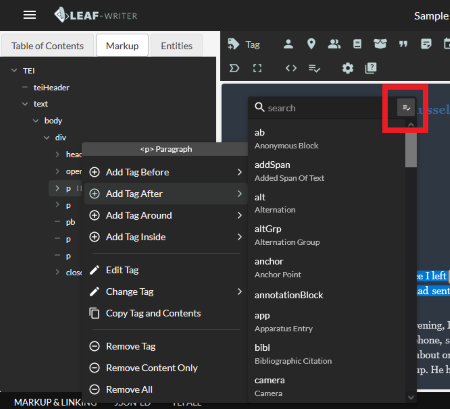
| Add Tag Before | Adds a tag before the tag you have right-clicked on. |
| Add Tag After | Adds a tag after the tag you have right-clicked on, skipping over any nested tags within the tag. |
| Add Tag Around | Adds a tag that will surround the originally selected tag. |
| Add Tag Inside | Adds a new tag nested within the initial tag you clicked on. |
The options to add or change a tag include a toggle next to the search bar (see screenshot below) that controls whether or not invalid tags are shown; by default, only valid tags are shown. This would allow you to add tags that require specific children tags in order to be valid based on the current document schema. Invalid tags will be greyed out and have an error icon next to them.
Create Structure
Copying and pasting is the quickest way to build the structure of your document:
- Click on a tag you would like to copy in the Markup Panel so it becomes bolded and italicized.
- Right-click the tag and select Copy Tag and Contents in the popup.
- Select the parent tag in the Markup Panel in which you would like to paste your copied tag so it becomes bolded and italicized.
- Right-click the parent tag and select Paste Tag in the popup. The copied tag will be pasted within the parent tag after the parent tag’s other content.
Once you paste a tag, it leaves your clipboard. You will have to complete the above steps every time you would like to copy and paste a tag.
Copy and pasting tags can create structural problems in your document if you are not careful. Make sure to fix validation errors often when copying and pasting tags.
Add Text
Place your cursor in the Editor Area and type to add text to your document. You can also copy and paste text directly into the Editor Area:
- Copy the information that you would like to paste. If you copy text from another XML document, all existing tags will be stripped out when the text is pasted into LEAF-Writer.
- Activate the field you want to paste into by clicking the tag in the Markup Panel. You cannot paste into multiple fields at once.
- Place your cursor in the highlighted area in the Editor Area.
- Paste the text using keyboard shortcuts (Ctrl+V or ⌘+V).
The Markup Panel tags will not be affected unless you have pasted over preexisting tags.
Tag Entities
LEAF-Writer is connected to the LEAF entity system, which allows you to reconcile entities in your text. See Reconciliation.
Named entities can be searched for from within LEAF-Writer using authoritative Linked Data (LD) sources such as DBPedia, Getty ULAN, GeoNames, VIAF, and Wikidata. Each source is best suited to certain entity types:
| DBPedia | Getty ULAN | GeoNames | VIAF | Wikidata | |
|---|---|---|---|---|---|
| Person | ✓ | ✓ | ✓ | ✓ | |
| Place | ✓ | ✓ | ✓ | ✓ | |
| Organization | ✓ | ✓ | ✓ | ||
| Text/Title | ✓ | ||||
| Citation | ✓ |
LEAF-Writer allows you to choose the sources you would like to use and order them by preference:
- Click Settings in the Toolbar.
- Drag to reorder the sources under Entity Lookup Sources.
If you are unable to find an appropriate entity using the LEAF entity system, you can manually add a URI to your document when tagging. While the URI will be added to your document, it will not be saved to the LEAF entity system.
The processes to tag a person, place, organization, text/title, referencing string, and citation are similar:
- Highlight the text that you would like to tag.
- Click the appropriate button in the toolbar for your entity (Tag Person, Tag Place, Tag Organization, Tag Text/Title, Tag Referencing String, or Tag Citation). A list of potential matches will appear in a popup.
- Choose the match that corresponds to the entity you wish to tag.
- [Optional] If none of the matches are correct, manually add a URI under Other / Manual Input.
- Click Select.
- Fill in the required information in the popup. The information required varies slightly depending on what type of entity you are tagging.
- Click OK.
The processes to tag a note, date entity, correction, keyword, or link are similar:
- Highlight the text that you would like to tag.
- Click the appropriate button in the toolbar for your entity (Tag Note, Tag Date, Tag Correction, Tag Keyword, Tag Link).
- Fill in the required information in the popup. The information required varies slightly depending on what type of entity you are tagging.
- Click OK.
Read-Only Mode
Next to the identity button in the top right corner there is a drop down menu that can change the mode of the document from Editing to Viewing. In this read-only mode, a number of functionalities are blocked or hidden to prevent changes in the document, namely:
- The Editor Area will not allow any typing or editing
- The toolbar will only show the Show Tags, Toggle Fullscreen, Settings, and Documentation buttons
- The Settings Menu will only show the options to modify the appeatance of the interface, change the language, change the font size, and toggle whether or not entities are highlighted
- The bottom bar will no longer show the buttons for Editor Mode, Annotation Mode, and Schemas
- The two side panels will only show the Table of Contents, Entities, and Image Viewer tabs, hiding the Markup, Raw XML, and Validation tabs
Additional functionality:
- At the top left of the workspace screen, next to the LEAF-Writer logo, you'll see three horizontal lines. Clicking on this icon will activate a drop-down menu that allows you to create a new, open, or import a document, save or save a different version of your document, or export the document in XML, HTML, or Markdown format. See HERE for more information about importing and exporting documents with the LEAF Turning Engine.
- At the bottom left of the workspace screen are indicators that notify you about which editor and annotation mode you're working in, and which schema you are using for your document. See HERE for more information about schemas and LEAF-Writer.
- At the bottom right of the workspace screen, you'll see a button called 'Bugs/Requests' that will take you to an issue form on the LEAF-Writer GitLab repository.
- At the upper right of the workspace screen, next to your user avatar, you'll see a toggle button that allows you to change from editing to viewing mode. In viewing mode you'll notice that most of your functionality has disappeared so that you can share a read-only version of your encoded document.
Version française
Qu’est-ce que LEAF-Writer?
LEAF-Writer est un éditeur d'encodage sémantique Web gratuit, qui vous permet de baliser des documents sans l’installation de logiciel propriétaire ni d’apprendre à coder. Avec LEAF-Writer, vous pouvez intégrer des balises significatives dans des textes afin qu'ils puissent être formatés, traités, analysés, visualisés, partagés et réutilisés. LEAF-Writer Commons vous permet d'ouvrir un fichier XML depuis votre bureau ou depuis le cloud via un référentiel GitHub. Il est également possible d’utiliser l'un des modèles spécifiques à un genre de LEAF-Writer (lettre, poème, prose, vierge) pour commencer. Une fois terminé, vous pouvez exporter votre fichier au format XML, HTML ou Markdown pour poursuivre votre travail ou publier votre texte sur un site web.
Accéder au LEAF-Writer
LEAF-Writer requiert un ordinateur avec accès à l’internet you will need a computer with internet access. À ce point, LEAF-Writer Commons n’est pas optimisé pour les appareils mobiles. LEAF-Writer est toutefois compatible avec tous les principaux navigateurs. Il n’est pas nécessaire de créer un compte pour utiliser LEAF-Writer. Vous pouvez par contre utiliser votre compte GitHub, ce qui est encouragé afin de profiter pleinement des fonctionnalités de LEAF-Writer, notamment la possibilité d'accéder et de collaborer sur à des documents dans le cloud. Si vous n'avez pas encore de compte GitHub, vous pouvez en créer un ici.
LEAF-Writer et vôtre confidentialité
Paramètres de confidentialité : lors de votre première connexion à LEAF-Writer, une bannière de notification relative aux cookies vous invitera à définir vos paramètres de confidentialité. Vous pouvez choisir d'accepter tous les cookies, certains d'entre eux ou aucun. Si vous choisissez « refuser tous les cookies », vous pourrez travailler en mode local dans LEAF-Writer (en téléchargeant et en enregistrant des fichiers sur votre bureau), mais vous ne pourrez ni accéder aux documents sur GitHub (« dans le cloud ») ni les partager. Vous pouvez à tout moment modifier vos paramètres de cookies en cliquant sur le « i » en haut à droite de cet écran.
Les paramètres de confidentialité sont accessibles avant ou après l'ouverture d'un document via le bouton d'identité situé dans le coin supérieur droit. Ces paramètres contiennent l'intégralité de la politique de confidentialité et vous permettent de personnaliser vos préférences en matière de consentement aux cookies. Les cookies strictement nécessaires, sans lesquels le site web ne peut fonctionner, ne peuvent pas être désactivés. Les cookies liés aux interactions et fonctionnalités de base peuvent être désactivés, mais cela limitera les fonctionnalités de LEAF-Writer. Les cookies de mesure anonymisés, qui collectent des informations sur votre activité sur le site web, peuvent également être désactivés. Vous pouvez modifier vos préférences en matière de cookies à tout moment, mais, à moins d'enregistrer au préalable, vous perdrez le travail d'annotation et de balisage en cours.
Explorer LEAF-Writer
Ouvrir un Document
Lorsque vous ouvrez LEAF-Writer, vous serez invité à choisir un modèle, ou à ouvrir un document à partir du Cloud ou de votre appareil. Si vous souhaitez ouvrir un document, celui-ci doit être compatible avec LEAF-Writer : il doit s'agir d'un document XML bien formé et référençant un schéma pris en charge par LEAF-Writer. Les schémas pris en charge comprennent les schémas sur mesure Orlando et CWRC, ainsi que les personnalisations fournies par la Text Encoding Initiative (TEI).
Ouvrir un modèle
Quatre modèles sont disponibles : Vierge, Lettre, Poème et Prose. Les modèles sont fournis avec du texte préexistant. Pour ajouter votre propre texte dans un modèle :
- Cliquez avec le bouton droit de la souris sur la balise qui contient le texte que vous souhaitez supprimer.
- Sélectionnez Supprimer uniquement le contenu. Cette action supprimera le contenu de la balise, mais laissera la balise dans le document.
- [Facultatif] Sélectionnez Tout supprimer pour supprimer le texte et la balise. Pour plus d'informations sur les balises, consultez les instructions du panneau de balisage.
Ouvrir à partir du Cloud
Vous pouvez rechercher et charger des documents ou des référentiels publics compatibles avec LEAF-Writer à partir de GitHub.
Téléchargez depuis votre ordinateur
Vous pouvez ouvrir un document compatible avec LEAF-Writer (c'est-à-dire un document qui a déjà été ouvert dans LEAF-Writer) à partir de votre ordinateur en ou en faisant glisser et déposer un fichier dans la fenêtre contextuelle qui apparaît.
Ouvrir un document XML
Vous pouvez coller du code XML directement dans la zone prévue à cet effet (voir la capture d'écran ci-dessous) pour créer un document compatible avec LEAF-Writer. Si le document n'est pas bien formé ou utilise un schéma qui n'est pas pris en charge par LEAF-Writer, il ne s'ouvrira pas.
Mode éditeur
Après avoir ouvert ou téléchargé votre document, une notification vous indiquera que vous travaillez en mode « Éditeur de balisage et de liens ».
LEAF-Writer propose trois modes d'édition pour s'adapter à votre façon de baliser et à ce que vous souhaitez faire avec le résultat de votre balisage. Vous pouvez choisir :
- Balisage uniquement : vous permet de baliser en XML à l'aide d'un schéma TEI ou Orlando.
- Balisage et liens : combine les balises XML et le RDF (Resource Description Framework) pour permettre des annotations du Web sémantique équivalentes aux balises XML que vous créez, et cohérentes avec la hiérarchie du schéma XML afin d'éviter tout chevauchement des annotations.
- D'autres modes de balisage sont en cours de développement. Balisage et liens (avec chevauchement) : permet de créer uniquement du RDF pour les entités ; chevauche les structures XML existantes.
- Le mode par défaut est Balisage et liaison, qui permet l'encodage XML et crée également des annotations Web pour certaines balises, représentées par des boutons dans le menu de LEAF-Writer. Les annotations sont stockées au format JSON dans la balise TEI < xenoData >.
- Si vous préférez créer un balisage XML sans annotations Web correspondantes, cliquez sur MARKUP & LINKING pour sélectionner le mode Balisage uniquement.
Fonctionnalités de l'espace de travail
Vous vous trouvez désormais dans l'espace de travail d'édition de LEAF-Writer.
Vous trouverez ci-dessous un bref aperçu de cet espace de travail. Les différents composants sont décrits plus en détail ci-dessous. Consultez le tutoriel étape par étape « Notions de base de LEAF-Writer » pour vous aider à démarrer avec LEAF-Writer.
L'espace de travail comporte quatre zones principales conçues pour optimiser votre expérience d'encodage :
- Le panneau de gauche, comprenant trois onglets: Table des matières, Balisage, Entités.
- L'espace d'édition central , où vous travaillez sur votre texte
- Le panneau de droite, comprenant trois onglets (XML brut, Visionneuse d'images, Validation)
- La barre d'outils, qui propose toutes vos options de balisage (éléments TEI, entités, traduction) ainsi que divers outils et paramètres.
Menu Fichier : en haut à gauche de l'écran de l'espace de travail, à côté du logo LEAF-Writer, vous verrez trois lignes horizontales. En cliquant sur cette icône, vous activerez un menu déroulant qui vous permettra de créer, d'ouvrir ou d'importer un document, d'enregistrer ou d'enregistrer une version différente de votre document, ou d'exporter le document au format XML, HTML ou Markdown. Cliquez ici pour plus d'informations sur le moteur LEAF Turning Engine.
Paramètres de l'éditeur : en haut à droite de l'écran de l'espace de travail, à côté de votre avatar utilisateur, vous verrez un bouton bascule qui vous permet de passer du mode édition au mode affichage. En mode affichage, vous remarquerez que la plupart des fonctionnalités de l'éditeur ont disparu pour offrir une version en lecture seule de votre document encodé. Paramètres d'encodage : en bas à gauche de l'écran de l'espace de travail se trouvent des indicateurs qui vous informent sur l'éditeur et l'annotation utilisés. le mode dans lequel vous travaillez et le schéma que vous utilisez pour votre document. Cliquez ICI pour plus d'informations sur les schémas et LEAF-Writer.
Signalement de bogues : en bas à droite de l'écran de l'espace de travail, vous verrez un bouton intitulé « Bugs/Requests » qui vous redirigera vers un formulaire de signalement sur le dépôt GitLab de LEAF-Writer.
Panneaux de navigation
Il y a trois onglets différents à la gauche de l’écran LEAF-Writer.
Table de matières
La table des matières vous permet de voir et de naviguer entre les différentes sections de votre document.
Panneau de balisage
Le panneau de balisage affiche les balises XML du document. À partir du panneau de balisage, vous pouvez ajouter, supprimer, modifier, copier et coller des balises dans le document. En cliquant sur une balise ou en passant votre souris dessus, vous verrez s'afficher le nom complet de la balise ainsi que les premiers mots de son contenu. Il y a deux manières de sélectionner une balise dans le panneau de balisage :
- Cliquez sur la balise jusqu'à ce l'icône apparaisse à côté pour sélectionner le contenu de la balise.
- Cliquez sur la balise jusqu'à ce que l'icône apparaisse à côté pour sélectionner à la fois le contenu de la balise et la balise elle-même.
Pour les utilisateurs avancés uniquement : le panneau de balisage vous permet également de modifier l'en-tête du document en cliquant avec le bouton droit de la souris sur teiHeader, ce qui ouvrira l'éditeur XML avec uniquement les éléments de l'en-tête du document. En ce moment, cette fonctionnalité est très limitée.
Panneau d’entités
Le panneau Entités vous permet de voir les entités balisées dans le document. Vous pouvez afficher les éléments de cet onglet en ordre séquentiel, alphabétique ou par catégorie. Passez votre souris sur une entité et cliquez sur Modifier (icône en forme de crayon) pour faire apparaître une fenêtre contextuelle dans laquelle vous pouvez modifier les attributs d'une entité. Passez votre souris et cliquez sur Supprimer (icône en forme de cercle) pour supprimer la balise.
Barre d’outils
LEAF-Writer dispose d'une barre d'outils qui permet d'ajouter, de modifier et de supprimer des balises.
| Icône | Action |
|---|---|
| Affiche la liste des balises disponibles que vous pouvez ajouter à votre document. | |
| Ouvre une fenêtre contextuelle permettant d'identifier une personne par son nom. |
| Ouvre une fenêtre contextuelle qui vous permet de marquer un lieu. |
| Ouvre une fenêtre contextuelle qui vous permet d'identifier une organisation ou une entreprise. | |
| Ouvre une fenêtre contextuelle qui vous permet d'ajouter des balises le titre ou le texte d'une oeuvre de tout type. |
| Ouvre une fenêtre contextuelle qui vous permet d'attribuer un nom générique ou une chaîne réferentielle. |
| Ouvre une fenêtre contextuelle qui vous permet de baliser une référence. | |
| Ouvre une fenêtre contextuelle qui vous permet de baliser une note ou une annotation. | |
| Ouvre une fenêtre contextuelle qui vous permet de baliser une date. |
| Ouvre une fenêtre contextuelle qui vous permet de baliser une correction que vous avez apportée au texte d'origine. |
| Ouvre une fenêtre contextuelle qui vous permet de baliser un mot-clé. |
| Ouvre une fenêtre contextuelle qui vous permet de baliser un lien ou une URL. |
| Ouvre une fenêtre contextuelle qui vous permet d'ajouter une traduction du texte contenu dans une balise div. La traduction s'affiche dans une nouvelle balise div ajoutée sous la balise contenant le texte d'origine. |
| Affiche ou masque les balises XML dans le Panneau d'édition. | |
| Ouvre un volet latéral à droite qui affiche le code XML brut du document. Ce volet contient également les onglets « Visionneuse d'images » et « Validation ». | |
| Vérifie la conformité du document XML contre le schéma associé. | |
| Ouvre le panneau paramètres. | |
| Passe en mode plein écran. | |
| Ouvre la documentation de LEAF-Writer dans un nouvel onglet. |
-
Le panneau Paramètres se trouve dans la barre d'outils. Utilisez le panneau Paramètres pour :
-
Modifier l'apparence de l'interface (mode clair, mode automatique, mode sombre).
-
Modifier la langue (anglais ou français).
-
Modifier la taille du texte dans la zone d'édition.
-
Activer ou désactiver la sauvegarde automatique.
-
Activer ou désactiver l'affichage (mise en surbrillance) des entités dans la zone d'édition.
-
Réorganiser la priorité des sources d'entités (voir Entités de balisage pour plus d'informations).
-
Autoriser ou interdire la sélection multiple dans le panneau de balisage.
-
Activer ou désactiver l'affichage des nœuds de texte. Si cette option est activée, vous pouvez autoriser le glisser-déposer et activer ou désactiver l'affichage du contenu des nœuds de texte.
-
Réinitialiser les avertissements de dialogue.
Validation
LEAF-Writer dispose d'une validation continue, ce qui signifie que vous n'aurez pas besoin de valider votre document manuellement pendant que vous travaillez. Si votre document devient invalide, une liste des erreurs apparaîtra dans le panneau de droite sous l'onglet Validation. Si vous souhaitez valider manuellement votre document XML, cliquez sur Valider dans la barre d'outils. Cliquez sur un message d'erreur pour mettre en évidence l'erreur dans le document. Vous pouvez alors corriger la structure invalide et le message d'erreur disparaîtra.
Créer une structure
Le moyen le plus rapide de créer la structure de votre document est avec la fonction copier-coller :
- Cliquez sur une balise que vous souhaitez copier dans le panneau de balisage afin qu'elle apparaisse en gras et en italique.
- Cliquez avec le bouton droit sur la balise et sélectionnez Copier la balise et contenu dans le menu contextuel.
- Sélectionnez la balise parent dans le panneau de balisage dans laquelle vous souhaitez coller la balise copiée afin qu'elle apparaisse en gras et en italique.
- Cliquez avec le bouton droit sur la balise parent et sélectionnez Coller la balise dans le menu contextuel. La balise copiée sera collée dans la balise parent après l'autre contenu de la balise parent.
Ajouter du texte
Placez votre curseur dans la zone d'édition et tapez pour ajouter du texte à votre document. Vous pouvez également copier et coller du texte directement dans la zone d'édition : Copiez les informations que vous souhaitez coller. Si vous copiez du texte à partir d'un autre document XML, toutes les balises existantes seront supprimées lorsque le texte sera collé dans LEAF-Writer. Activez le champ dans lequel vous souhaitez coller le texte en cliquant sur la balise dans le panneau de balisage. Vous ne pouvez pas coller dans plusieurs champs à la fois. Placez votre curseur dans la zone en surbrillance de la zone d'édition. Collez le texte à l'aide des raccourcis clavier (Ctrl+V ou ⌘+V).
Les balises du panneau de balisage ne seront pas affectées, sauf si vous avez collé par-dessus des balises préexistantes.
Lier vôs entités
LEAF-Writer est connecté au système d'entités LEAF, qui vous permet de rapprocher les entités dans votre texte.
Les entités nommées peuvent être recherchées dans LEAF-Writer à l'aide de sources de données liées (LD) faisant autorité telles que DBPedia, Getty ULAN, GeoNames, VIAF et Wikidata. Chaque source est mieux adaptée à certains types d'entités :
LEAF-Writer vous permet de choisir les sources que vous souhaitez utiliser et de les classer par ordre de préférence :
- Cliquez sur Paramètres dans la barre d'outils.
- Faites glisser pour réorganiser les sources sous Sources de recherche d'entités.
Les processus permettant de baliser une personne, un lieu, une organisation, un texte/titre, une chaîne de référence et une citation sont similaires :
- Mettez en surbrillance le texte que vous souhaitez baliser.
- Cliquez sur le bouton approprié dans la barre d'outils pour votre entité (Baliser une personne, Baliser un lieu, Baliser une organisation, Baliser un texte/titre, Baliser une chaîne de référence ou Baliser une citation). Une liste de correspondances potentielles apparaîtra dans une fenêtre contextuelle.
- Choisissez la correspondance qui correspond à l'entité que vous souhaitez marquer.
- [Facultatif] Si aucune des correspondances n'est correcte,ajoutez manuellement un URI sous « Autre / Saisie manuelle» .
- Cliquez sur « Sélectionner ».
- Remplissez les informations requises dans la fenêtre contextuelle. Les informations requises varient légèrement en fonction du type d'entité que vous marquez.
- Cliquez sur « OK ».
Mode lecture
À côté du bouton d'identité dans le coin supérieur droit, un menu déroulant permet de passer du mode édition au mode affichage. En mode lecture seule, certaines fonctionnalités sont bloquées ou masquées afin d'empêcher toute modification du document, à savoir :
*La zone d'édition ne permet ni saisie ni modification.
- La barre d'outils n'affiche que les boutons « Afficher les balises » , « Basculer en plein écran », « Paramètres » et « Documentation ». *Le menu Paramètres n'affiche que les options permettant de modifier l'apparence de l'interface, de changer la langue, de modifier la taille de la police et d'activer ou désactiver la mise en surbrillance des entités.
- La barre inférieure n'affiche plus les boutons Mode Éditeur, Mode Annotation et Schémas.
- Les deux panneaux latéraux n'affichent que les onglets Table des matières, Entités et Visionneuse d'images, masquant les onglets Balises, XML brut et Validation.
Fonctionnalités supplémentaires:
- En haut à gauche de l'écran de l'espace de travail, à côté du logo LEAF-Writer, vous verrez trois lignes horizontales. En cliquant sur cette icône, vous activerez un menu déroulant qui vous permettra de créer un nouveau document, d'ouvrir ou d'importer un document, d'enregistrer ou d'enregistrer une version différente de votre document, ou d'exporter le document au format XML, HTML ou Markdown. Cliquez ICI pour plus d'informations sur l'importation et l'exportation de documents avec le moteur LEAF Turning Engine.
- En bas à gauche de l'écran de l'espace de travail, des indicateurs vous indiquent dans quel mode d'édition et d'annotation vous travaillez, ainsi que le schéma que vous utilisez pour votre document. Cliquez ICI pour plus d'informations sur les schémas et LEAF-Writer.
- En bas à droite de l'écran de l'espace de travail, vous verrez un bouton intitulé « Bugs/Requests » (Bugs/Demandes) qui vous mènera à un formulaire de signalement sur le référentiel GitLab de LEAF-Writer.
- En haut à droite de l'écran de l'espace de travail, à côté de votre avatar utilisateur, vous verrez un bouton qui vous permet de passer du mode édition au mode affichage. En mode affichage, vous remarquerez que la plupart des fonctionnalités ont disparu afin que vous puissiez partager une version en lecture seule de votre document encodé.